source(google.com.pk)
Rangoli Patterns Biography
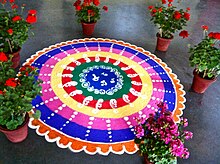
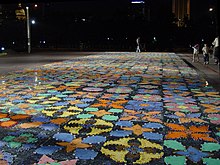
Rangoli patterns are traditionally drawn with the fingers using flour, rice grains or coloured chalk.Rangoli can be square, rectangular or circular – or a mix of all three. They are often symmetrical. Rangoli motifs are usually taken from Nature - peacocks, swans, mango, flowers and so on.Rangoli were originally done in small patterns of about 2 foot square, but now entire areas of floor can be covered in intricate designs, often produced by first drawing gridlines in light chalk.We have a number of suggestions below for creating Rangoli designs, suitable for children of all ages and abilities.
Rangoli Examples
Rangoli come in all shapes and sizes! Before you make your own it is a good idea to have a look at a variety of different examples - perhaps you could print some out to look at with your children or sit at the computer together.Simple rangoli design drawn with rice powder in the dirt Rangoli design with diya in centre Peacock rangoli design Creating your own rangoli
1. Decide on your design
The examples above may have inspired your children to create their own design - or they may need extra help. Talk about how the designs are usually symmetrical and geometric. Examine the sort of motifs, symbols and colours used in the examples above.For younger children, it may be best for you to draw the outline of a simple design and ask the children to colour it in.Older children can draw their own outline freehand, or use one of our grid papers to create a design. The advantage of using a grid paper is that the design can then easily be transferred onto a larger surface.Example 1: some fantastic grid designs to inspire you.Example 2: more grid designsAlternatively, use one of our Rangoli colouring pages for inspiration or to trace.2. Decide on your medium and surfacea) Chalk RangoliEven the youngest children will enjoy creating their own chalk rangoli designs.
First, use a white chalk to outline your patterns, or to draw dots to form a grid. Then use coloured chalks or poster paint to fill in the design.You will need:Black paper (or sandpaper - see below Chalk RulerUse your ruler to draw out a grid of dots. These can be as close together (to make the design intricate) or as far apart (for more simple designs) as you like. We used a grid 15cm by 15cm with 3 cm intervals.Now draw on your design with the chalk (you could try sketching out your design first on our grid paper). Look at our examples for inspiration. Younger children may need a design drawn for them to colour.
Use coloured chalks to colour in the design.Chalk rangoli pictures like these have the added advantage that you can display and save your child's creation longer than the first rain!
You can also use sandpaper instead of black paper. The picture is less liable to smudge and should last longer, and it feels more like colouring onto the pavement outside!
Outdoor RangoliYou will need:
Chalk
Food colouring (in a number of colours)
Plain flour
Long rule
Thick paint brush
Area of yard or garden path
Use your ruler to draw out a grid of dots, as close together (for intricate designs) or as far apart as you like. In our outdoor rangoli, we used a grid 50cm by 50cm with 5cm intervals.Now draw on your design with the chalk (perhaps sketching it out first on our grid paper). As before, younger children may need a design drawn for them to colour.Mix together half a cup of flour with a few drops of food colouring and a little water until it forms a paste about the texture of PVA (white) glue. Repeat for each colour of food colouring that you are using. Use your pastes to paint your design.Note: this will stain the path for quite a while (perhaps permanently) so make sure you have permission first! You may want to paint your design onto a large, movable paving stone instead of directly onto the ground. Jack's design drawn with chalk on the driveway
Jack painting his rangoli designJack's finished rangoli - beautiful!b) Coloured sand or salt rangoli It is now possible to purchase coloured sand (used mainly for creating layered bottle designs). Alternatively, add food colouring to salt, spread thin and allow to dry out.
In traditional rangoli, the outline pattern is drawn on the floor and then filled in by carefully sprinkling coloured powders. Older children could try this technique directly on the ground with coloured sand or salt, having drawn their outline with chalk. Make sure they try this somewhere away from too much foot traffic, and easy to clean!You may prefer to draw your outline on a piece of dark coloured paper and then fill in each section with white glue, sprinkling with sand or salt as you would with glitter. Do one colour at a time and shake the excess off onto a large piece of newspaper.Children could use glitter in some areas of the design for contrast and emphasis.Rangoli diya design with coloured rice c) Lentils and other pulsesFollow the link below to see an example of children using lentils and other colourful materials to create rangoli designs.


Rangoli Patterns Biography
Rangoli patterns are traditionally drawn with the fingers using flour, rice grains or coloured chalk.Rangoli can be square, rectangular or circular – or a mix of all three. They are often symmetrical. Rangoli motifs are usually taken from Nature - peacocks, swans, mango, flowers and so on.Rangoli were originally done in small patterns of about 2 foot square, but now entire areas of floor can be covered in intricate designs, often produced by first drawing gridlines in light chalk.We have a number of suggestions below for creating Rangoli designs, suitable for children of all ages and abilities.
Rangoli Examples
Rangoli come in all shapes and sizes! Before you make your own it is a good idea to have a look at a variety of different examples - perhaps you could print some out to look at with your children or sit at the computer together.Simple rangoli design drawn with rice powder in the dirt Rangoli design with diya in centre Peacock rangoli design Creating your own rangoli
1. Decide on your design
The examples above may have inspired your children to create their own design - or they may need extra help. Talk about how the designs are usually symmetrical and geometric. Examine the sort of motifs, symbols and colours used in the examples above.For younger children, it may be best for you to draw the outline of a simple design and ask the children to colour it in.Older children can draw their own outline freehand, or use one of our grid papers to create a design. The advantage of using a grid paper is that the design can then easily be transferred onto a larger surface.Example 1: some fantastic grid designs to inspire you.Example 2: more grid designsAlternatively, use one of our Rangoli colouring pages for inspiration or to trace.2. Decide on your medium and surfacea) Chalk RangoliEven the youngest children will enjoy creating their own chalk rangoli designs.
First, use a white chalk to outline your patterns, or to draw dots to form a grid. Then use coloured chalks or poster paint to fill in the design.You will need:Black paper (or sandpaper - see below Chalk RulerUse your ruler to draw out a grid of dots. These can be as close together (to make the design intricate) or as far apart (for more simple designs) as you like. We used a grid 15cm by 15cm with 3 cm intervals.Now draw on your design with the chalk (you could try sketching out your design first on our grid paper). Look at our examples for inspiration. Younger children may need a design drawn for them to colour.
Use coloured chalks to colour in the design.Chalk rangoli pictures like these have the added advantage that you can display and save your child's creation longer than the first rain!
You can also use sandpaper instead of black paper. The picture is less liable to smudge and should last longer, and it feels more like colouring onto the pavement outside!
Outdoor RangoliYou will need:
Chalk
Food colouring (in a number of colours)
Plain flour
Long rule
Thick paint brush
Area of yard or garden path
Use your ruler to draw out a grid of dots, as close together (for intricate designs) or as far apart as you like. In our outdoor rangoli, we used a grid 50cm by 50cm with 5cm intervals.Now draw on your design with the chalk (perhaps sketching it out first on our grid paper). As before, younger children may need a design drawn for them to colour.Mix together half a cup of flour with a few drops of food colouring and a little water until it forms a paste about the texture of PVA (white) glue. Repeat for each colour of food colouring that you are using. Use your pastes to paint your design.Note: this will stain the path for quite a while (perhaps permanently) so make sure you have permission first! You may want to paint your design onto a large, movable paving stone instead of directly onto the ground. Jack's design drawn with chalk on the driveway
Jack painting his rangoli designJack's finished rangoli - beautiful!b) Coloured sand or salt rangoli It is now possible to purchase coloured sand (used mainly for creating layered bottle designs). Alternatively, add food colouring to salt, spread thin and allow to dry out.
In traditional rangoli, the outline pattern is drawn on the floor and then filled in by carefully sprinkling coloured powders. Older children could try this technique directly on the ground with coloured sand or salt, having drawn their outline with chalk. Make sure they try this somewhere away from too much foot traffic, and easy to clean!You may prefer to draw your outline on a piece of dark coloured paper and then fill in each section with white glue, sprinkling with sand or salt as you would with glitter. Do one colour at a time and shake the excess off onto a large piece of newspaper.Children could use glitter in some areas of the design for contrast and emphasis.Rangoli diya design with coloured rice c) Lentils and other pulsesFollow the link below to see an example of children using lentils and other colourful materials to create rangoli designs.
Rangoli Patterns
Rangoli Patterns
Rangoli Patterns
Rangoli Patterns
Rangoli Patterns
Rangoli Patterns
Rangoli Patterns
Rangoli Patterns
Rangoli Patterns
Rangoli Patterns
Rangoli Patterns
Rangoli Patterns
Rangoli Patterns
Square Rangoli Patterns Using Dots 5*5
Rangoli Patterns.
Simple And Small Rangoli Patterns Using Dots
No comments:
Post a Comment